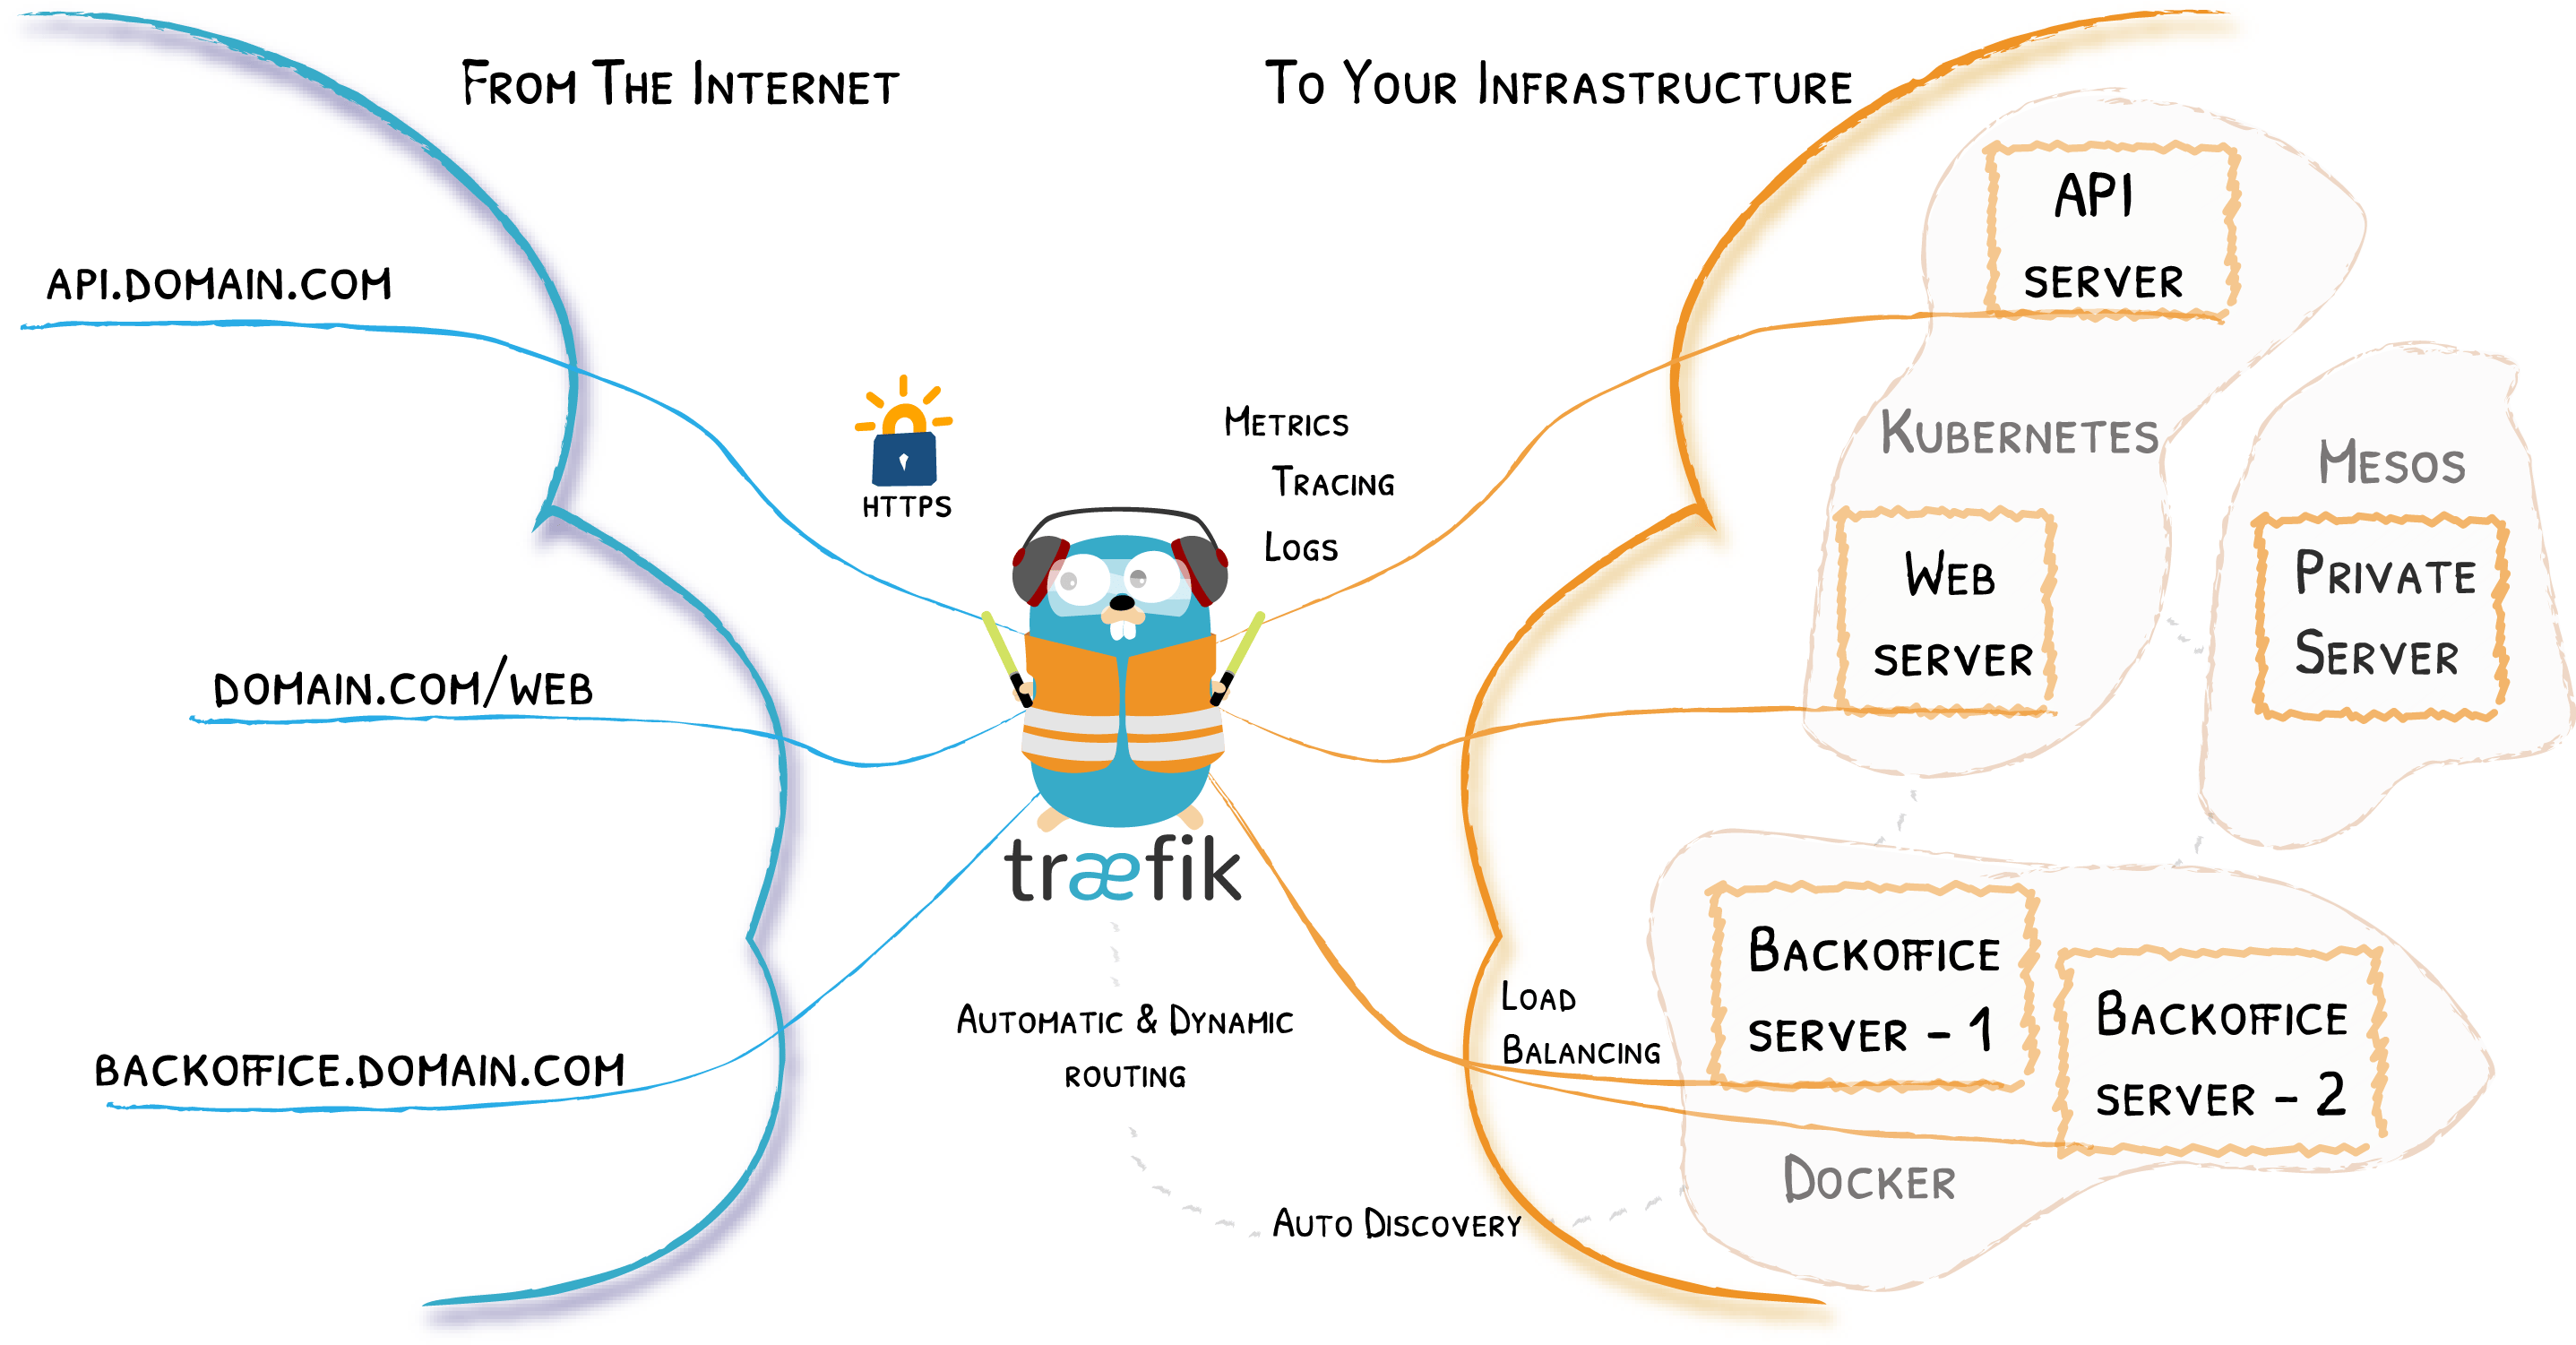
Why Traefik?
Everyone who has a homelab knows the vast amount of services and configurations that, at some time, could be deployed. We usually start setting up only a few services such as plex or pihole on a minimal Raspberry Pi (with only 1Gb of RAM in my case) and end up selfhosting several services. I have already more than 30 docker containers running smoothly on my new server. So scalability matters, and taking into account that security is my first concern when exposing my server to the Internet, I had to expose my services via Traefik, although some alternatives are becoming popular, such as Caddy.
Traefik is an open-source reverse proxy compliant with Docker (and docker Swarm or K8S, in case our homelab continues raising…). It automates the creation and renewal of SSL certificates and has endless configurations for every scenario. Keep reading to learn how to set up your traefik container in less than 5 minutes!
Note: With this configuration, only ports 80 and 443 in our router are needed to be opened and redirected to our homelab (which will map to our traefik container ports). We will never have to open any different port due to traefik manages all the incoming requests through that ports. Moreover, connections via port 80 are going to be redirected to port 443 in order to force encrypted https connections.
Networking and Container configuration
Firstly, I am going to define an isolated docker network in order to agrupate all my exposed services into the same environment. The network traefik-public is defined at the end of my docker-compose.yaml file.
At the beginning of the docker-compose file, I define the traefik container. It is going to be deployed with some security options, a healthcheck, using my isolated traefik-public network and with a memory limit that allows me to set a maximum amount of RAM to the container so the host couldn’t get an OOM error and kill my entire server.
Furthermore, it is important to redirect 80 and 443 ports from the host to the traefik container itself to manage the incoming requests. The path_to_traefik_config is where my traefik configuration files are going to be stored. I use this volume mapping to keep the container configuration even when it is recreated.
docker-compose.yaml
version: "3.7"
services:
  traefik:
    image: traefik:v2.9
    container_name: traefik
    mem_limit: 1024M
    networks:
      - traefik-public
    security_opt:
      - no-new-privileges:true
    ports:
      - 80:80
      - 8080:8080
      - 443:443
    environment:
    - TZ='Europe/Madrid'
    volumes:
      - /etc/localtime:/etc/localtime:ro
      - /var/run/docker.sock:/var/run/docker.sock:ro
      - <path_to_traefik_config>/traefik.yaml:/etc/traefik/traefik.yml:ro
      - <path_to_traefik_config>/dynamic_conf.yaml:/etc/traefik/dynamic_conf.yaml:ro
      - <path_to_traefik_config>/acme:/etc/traefik/acme
    labels:
      # Traefik dashboard
      traefik.enable: true
      traefik.http.routers.dashboard.rule: Host (`<HOST_LOCAL_IP>`) && (PathPrefix(`/api`) || PathPrefix(`/dashboard`))
      traefik.http.routers.dashboard.entrypoints: traefik
      traefik.http.routers.dashboard.service: api@internal
    healthcheck:
      test: traefik healthcheck --ping
      interval: 10s
      timeout: 5s
      retries: 3
      start_period: 5s
    restart: unless-stopped

networks:
  traefik-public:
    name: traefik-public
    driver: bridge
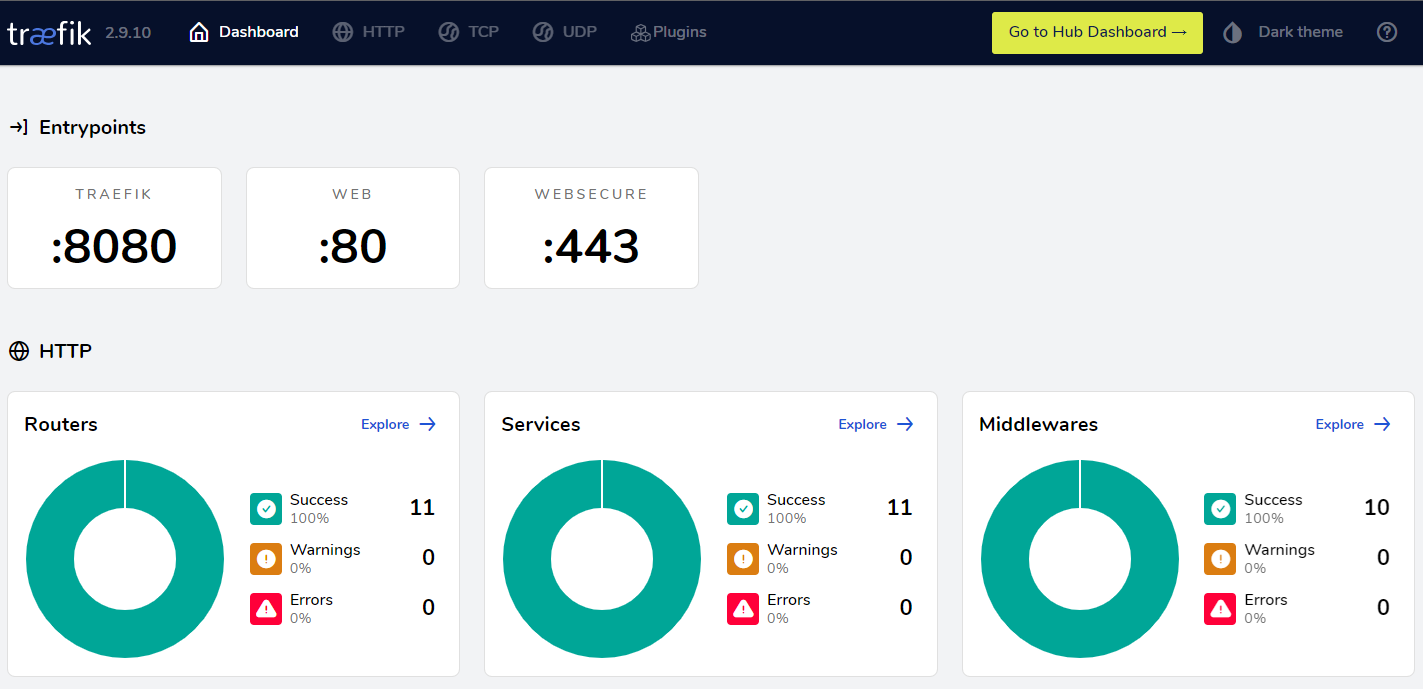
Enabling dashboard
This example includes traefik dashboard configuration, a UI that shows the status of our traefik resources as routers, services, middlewares, and so on. There are several ways to configure the dashboard, I chose to redirect port 8080 and create a traefik router (via labels) that provides its dashboard when accessing http://HOST_LOCAL_IP:8080/dashboard/
traefik.yml & dynamic_conf.yaml
These are both configuration files, known as “static” and “dynamic” configurations, respectively. I’m going to leave the dynamic configuration as an empty file and explain its contents in the following post due to it involves advanced concepts and routing.
The purpose of the static configuration file is to define common resources in our traefik infrastructure. I started enabling the API to access to get my preconfigured dashboard, setting insecure: true due to I access locally through an unencrypted connection (HTTP). Another mandatory resource to define is entrypoints. Matching with previously opened ports (80 and 443), I have defined web (HTTP) port and redirected its incoming traffic to the HTTPS port (websecure). This is the way to enforce secure and encrypted connections (via https).
Finally, I define letsencrypt as my certificate resolver. It will provide us free certificates, automate their renewal, and run a protocol which is called Automatic Certificate Management Environment (ACME). Letsencrypt needs to validate our traffic and distinguish between users and malicious bots, this is done by running an httpChallenge.
At the end of the file, I configured the docker provider defining the traefik network and docker endpoint, using the docker socket volume mount that I have previously defined in the docker-compose file. This allows traefik to interact with other containers and create resources based on their labels. We will see an example in the following section. Here it is the complete traefik.yml file:
traefik.yml
api:
  dashboard: true
  insecure: true

ping: true # healthcheck

entryPoints:
  # http redirect to https
  web:
    address: :80
    http:
      redirections:
        entryPoint:
          to: websecure
          scheme: https
  # https
  websecure:
    address: :443
    http:
      tls:
        certResolver: letsencrypt

# letsencrypt TLS
certificatesResolvers:
  letsencrypt:
    acme:
      email: <YOUR_EMAIL_HERE>
      storage: /etc/traefik/acme/acme.json
      tlsChallenge: {}
      httpChallenge:
        entryPoint: web

providers:
  file:
    filename: /etc/traefik/dynamic_conf.yaml # blank file at this point
    watch: true
  docker:
    watch: true
    exposedByDefault: false
    endpoint: unix:///var/run/docker.sock
    network: traefik-public
At this point, everything has been defined so it’s time to create our traefik service!
docker compose -f docker-compose.yaml up -d
Test deployment
Let’s test the traefik container by creating a new service:
version: "3.7"
services:
  whoami:
    image: traefik/whoami
    container_name: whoami
    networks:
      - traefik-public
    labels:
      traefik.enable: "true"
      traefik.http.routers.whoami.rule: Host (`<HOST_LOCAL_IP>`) && PathPrefix(`/whoami`)
      traefik.http.routers.dashboard.entrypoints: web
This service has to be deployed in the traefik-publiic network. Also, I have created an HTTP router that tells traefik how to respond. When trying to access http://HOST_LOCAL_IP/whoami on your LAN, traefik would respond by redirecting the request to the whoami services via HTTPS (without SSL cert because we are accessing a local IP). We would see the following information:
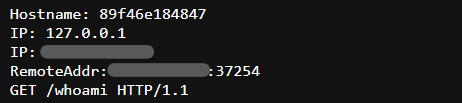
Alternatively, we can get the same response by running the curl command:
curl -k http://HOST_LOCAL_IP/whoami
Congrats! You have correctly configured your traefik service and it’s up & running!!
Conclusion and further improvements
To conclude, I’d like to note that whereas setting up a minimal traefik service is very straightforward, reaching a hardened configuration could need some expertise. In the following post, I will explain how to improve security via traefik plugins, docker socket-proxy, middlewares, access logs and other services.
Documentation